
In my first two months playing Gem Blenders, I have learned a lot beyond just the core rules. Much of this has been through trial and error or by being observant of what my opponents have done well. You may already have picked up on some or even all of these lessons that I will mention, even if only subconsciously. If not, fear not, because in this blog I will go over four lessons that I believe have made me a better Gem Blender.
lesson #1: ‘Wasted’ gems
Let us start with my hands-down favorite hero in the game, Hickory!
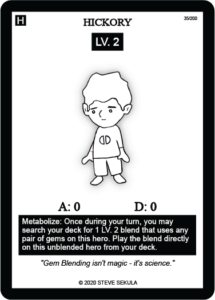

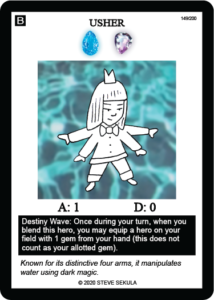
Hickory is not the simplest of heroes, though his usage is very straightforward. He allows for searching out any LV. 2 blend matching the gems attached to him, which opens up a wealth of opportunities for consistency. I have used Hickory in a lot of decks, paired with either Usher or Bishop. Usher is a LV. 2 blend that allows for one additional gem-drop when blended, and Bishop is a LV. 2 blend that lets you find a LV. 3 blend and a gem.
In theory, using Usher helps boost the tempo of the deck by getting more gems out, and Bishop can give much-needed consistency instead of relying on card draw. However, investing all these gems into Hickory comes at a cost, because they don’t get invested into the main blends of the deck.
If all gems are attached perfectly to a LV. 5 hero, one can get a LV. 5 blend out after five gem-drops. But because I have already attached 2 gems to Hickory, I am in essence slowing down the setup by ‘wasting’ two gems which could have gone to the higher level hero.
With Usher, it takes three separate effect uses to make up for the cost of attaching gems to Hickory instead of a LV. 5 hero. With Bishop, deciding whether or not you should use it is a question of consistency outweighing the slowness of setting Hickory up.
This issue can be detrimental as being one or two turns slower to set up, especially if the opponent is moving fast, can see you lose a round.

One way to mitigate this is to simply play Min-Seo. At first glance, her effect is basically the same as Hickory’s, except that Min-Seo only needs one gem to get the effect going. All the gems afterwards can be attached to the hero onto which I really want to blend my higher-leveled blends. This way, I am ‘wasting’ one less gem compared to when using Hickory. It is, however, still ‘wasting’ a gem.
This is also the issue with heroes such as Fatima and Gloria. Even though they allow for searching out crucial gems, it comes at the cost of ‘wasting’ a gem — especially if one needs a very specific gem to get going.
Fortunately, there is one solution which solves even that issue, such that no gems will be ‘wasted.’
TL;DR: Attaching gems to a low-level hero for the sake of using an effect that helps with consistency is well and good, but it slows down the overall setup time by ‘wasting’ a gem such that a high-level blend can’t make any use of it.
lesson #2: gem movement


The issue of having gems stuck on Hickory was not really one I understood before playing around with Francisco and later with Leihlani, because it became apparent to me how strong it is to get gems to where they need to be when one needs them.
Leihlani is in this regard super potent, as I am free to do whatever I want to, because Leihlani’s effect lets me move all of the gems on my field to her. For example, take Claire, a LV. 4 Hero who allows an additional gem-drop on the first turn. Both the gem attached to Claire, and the gem attached using Claire’s effect, can be redistributed to Leihlani. Getting full usage of the momentum that a double gem-drop provides on turn one can be very advantageous. This also helps redistribute the gems from Hickory once I am done using Hickory’s effect.
This way, as soon as I have all gems out that I need for my LV. 5 or LV. 4 blend (depending on what deck I am running), I can pull them onto Leihlani, ‘wasting’ no gems while keeping the consistency and momentum. Of course, depending on the deck, it might not make a difference for when I have the final setup, though it does help getting some early pressure out which can land me a round.
Francisco works in similar ways. He allows me to move gems away from heroes who don’t need them anymore, towards heroes that do. For example, let’s say I need a Pyrogem for Bishop on Hickory, as well as a Pyrogem for Flash Blaster which cannot be blended onto Hickory. Using Francisco, that Pyrogem can then be pulled from Hickory towards the hero onto which Flash Blaster can be blended after I am done with Bishop’s effect.

In one of my tournament-winning decks, getting the Pyrogem redistributed to Flash Blaster using Francisco saves me one gem-drop, and I can therefore set up that much sooner and consistently, as I do not have to go looking for a second Pyrogem.
This might have been a lot to take in, but stick with me! We are not done yet.
TL;DR: Using Francisco’s effect helps redistribute gems so no gems end up being stuck on a hero with a low level of consistency, and gets the gems to a hero that can become a high-level blend. It also gets key gems to wherever they need to be on the field instead of having to search a second copy out.
lesson #3: fragility and disruption

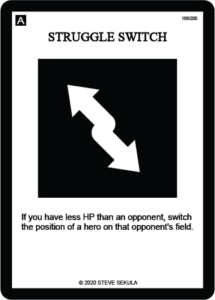
There are a few cards in the game which can move the opponent’s heroes around. Struggle Switch and Force Switch are especially worthy of note here, as they can be incorporated into just about every deck.
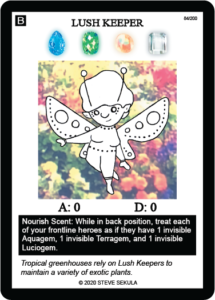


Take a look at Lush Keeper and Magnet—two blends with effects that help your frontline heroes when they are in the back position. For these blends, one can see one’s whole field fall apart if these blends are moved out of the back position. They reveal a larger issue with certain blend strategies: decks that rely heavily on positioning have to conform to one of two options. They must either be able to protect heroes from disruption, or they must have the ability to get heroes back into their required positions.
Devin, a hero that lets back-position-only effects be played from anywhere on the field, is one option in a Lush Keeper or Magnet deck, though it is not perfect; when you’re disrupted by switching, the blend that moved to the back position, at least for now, won’t be covered by the effect of Lush Keeper or Magnet. This seriously hurts the viability of decks like these, and has to be considered when both building them, and playing them.
All decks of course suffer from being moved around, to some extent, either because they lose their main attacker or because their effects won’t work in their new position. Therefore, being able to move back into position through some means is always something I consider when building a deck. Even if the meta does not showcase a lot of movement disruption, being able to move around is always helpful to either to get around attacking opposing blends with high defenses or to move your heroes to defend against attacks.
There are, of course, other types of disruption which can hurt some decks more than others, such as the 3-star action Drain, which allows you to discard one of your opponent’s gems. No deck can therefore rely on only having the minimal number of required gems for the deck. The 3-star action Dissolve, which allows the opponent to deblend one of your Blends, is a similar problem. Again, the issue is that you cannot rely on having the minimal number of blends that you need, even if you can search them out perfectly.


The lesson in all of this, is that all decks can be set back to some regard, whether by movement disruption or by losing Gems or Blends. All decks should therefore include tools that allow for weathering a storm. Some decks will need more of these tools than others, which is another consideration that is necessary to make when building a deck, as it highly influences the deck’s viability.
TL;DR: Being moved around or losing resources can spell disaster for many decks, some more than others. Therefore, when constructing a deck, one must consider the important metrics of how fragile the deck is and how many options the deck has to stay resilient to disruption, as these will both impact the viability of the deck.
lesson #4: damage and defenses
For my fourth and final point, I want to bring attention to something that keeps surprising me: how much 2 or even just 1 defense on a blend or hero matters in the long run.


In Gem Blenders, as in the majority of card games, you should never consider your final setup in isolation. The road getting there is vital. If your opponent is fast at getting set up, you might see yourself overrun. One way to mitigate this, is to simply play blends and heroes with just a bit of defense. Think about it: if you are attacked by a blend with 5 attack, and you have 20 HP, you will be down a round in 4 turns. If you can decrease the damage you take each turn to 4 by having a hero or blend with just one defense standing in front of the attacker, you will now survive for 6 turns. This is already netting you one more turn that can be either spent on setting up for Round 2 or turn Round 1 around.
Defense is a good portion of the game and matters a lot. If I have a deck that needs a long time to set up, while having just about no defenses, I always find myself questioning the viability of said deck. Having no defenses might make me lose before I can do anything about it.
TL;DR: Defenses play a huge part in protecting against sustained damage that can take one down before getting set up.
in conclusion
By being observant and considerate of the 4 lessons mentioned in this blog post, I find that I am much better able to consider the viability of a deck before it hits testing. I am also better at considering which decks are worth my time, and which decks might be too fragile. By being observant and considering the impact of different deckbuilding decisions on all aspects of the game, I hope to continue to find more lessons and continue to improve both my decks and how I play. Thank you for reading everyone — see you on the field!